At USB Memory Direct we know how incredibly important it is that your business stands out from the rest of the crowd. This is why we offer large corporations and small businesses alike our custom shaped USB drives. Not only are they an excellent branding opportunity for your business, but they are also the perfect medium for distributing marketing and sales materials in an efficient, affordable, easy-to-use way.
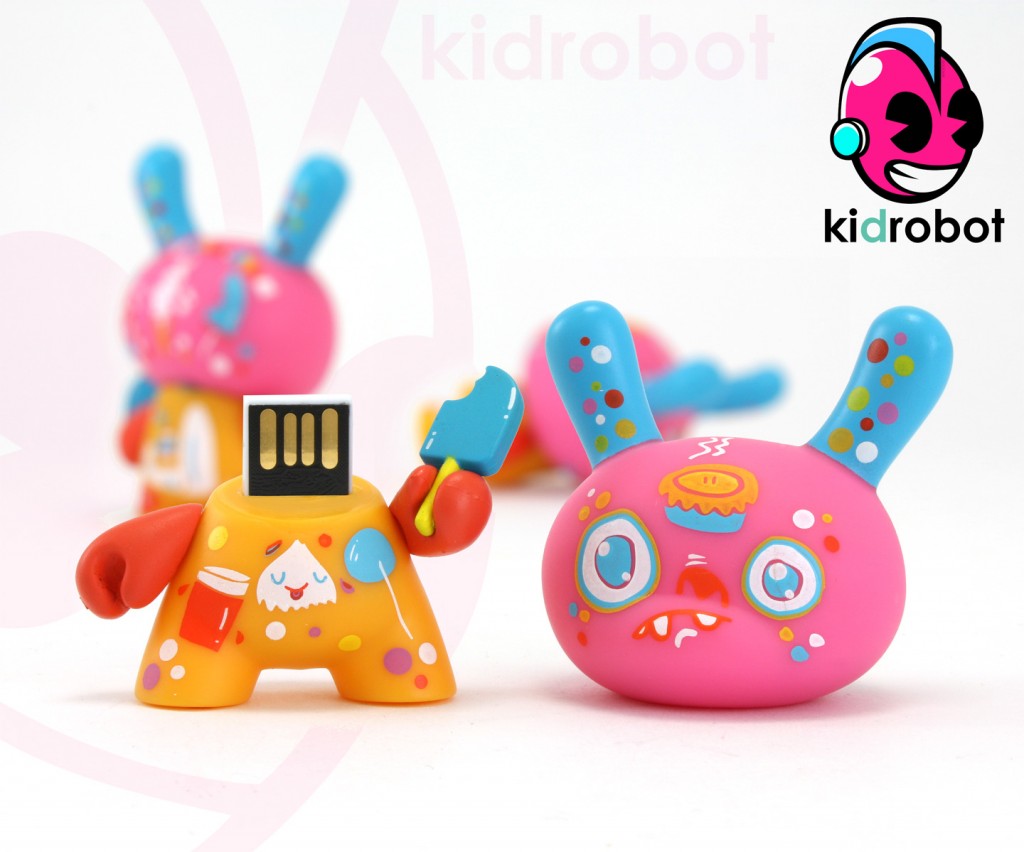
In today’s custom shaped drive concept, we explored some of the most popular kidrobot designs. kidrobot is one the world’s premier creators of high-quality, art-driven designer products, inspired by urban street trends, fashion, and pop art. Our concept was created in collaboration with skilled creative artists from backgrounds as diverse as graffiti, fine art, graphic design, illustration and music.

kidrobot USB drives could be highly collectible and sought after by USB toy enthusiasts worldwide thanks to kidrobot’s artistic appeal and unique product design aesthetic. At USB Memory Direct we admire distinctive and vibrant novelty collections and enjoy exploring the potential of our custom shaped drives through the artistic and collaborative energy of popular designers and artists.
As a creative and highly effective replacement for the traditional business card, this is just an example of how you can use our custom shaped drives service in new and exciting ways.
How often have you been handed a business card and accidentally lost it, or just intentionally threw it away? We can all say that we’ve done it and it’s hardly a surprise considering all the cards we get and how useless they are once we upload their contact information on our computer or mobile device. At USB Memory Direct we have an endless variety of shapes, sizes and data capacities that are all available when designing your custom shaped drives.
With our custom shaped USB drives your company brand or logo will never be forgotten, not only because of its unique shape and form, but because it is completely useful to the recipient. You can easily transfer music, files, photos and video and store that content for use on any computer. Find out more
Here are some more concept custom flash drives we put together. These feature various skateboarding companies such as Adio Footware, Antik Skateboots Vans and Shaun White Skateboarding.

We are experts at custom usb drive marketing, and can make great looking flash drives no matter what your brand or company is about. Visit our website www.usbmemorydirect.com and take a look at the dozens of various styles and shapes our flash drives come in. Simply fill in our request form and we will get back to you with a quote for your very own branded USB drives.


Being in the promotional marketing industry, most of the custom flash drives we produce feature a business name or logo, along with contact information or address. Sometimes though, the unique and eye-catching designs speak for themselves, and no other information is required. These custom art USB drives have a certain flair and are excellent tools for getting the attention of the young and trendy demographics that have the most disposable income. To showcase the types of artwork and design we see attracting people’s attention, we commissioned a few designs and created a few concept flash drives we know you’ll love. Take a look for yourself, and if inspiration hits you, head over to www.usbmemorydirect.com to make your vision a reality.


Poker Chips USB drive
Nowadays it seems not even promotional flash drives are enough to capture the attention of customers. Sure a USB drives are always received eagerly and kept for future use because of their data storage capabilities, but it’s that initial spark of interest that needed a little tweaking.
Enter Custom Shaped flash drives. USB wholesalers can basically take any idea, sketch, drawing, or crazy concept you come up with and use their resources to turn it into a custom shaped flash drive. Just as the name implies, these drives have a customized shape that usually are unique to a company logo, brand, product, or mascot. Say you run a golf club and are looking to give out promotional USBs featuring the new golf course layouts you’ve put together at the grand opening – you could ask that the drives be shaped like golf balls, golf tees, or golf clubs. Stuff like this always comes across as in-the-now, relevant, stylish, funny, and eye catching at marketing events and go out like hot cakes.
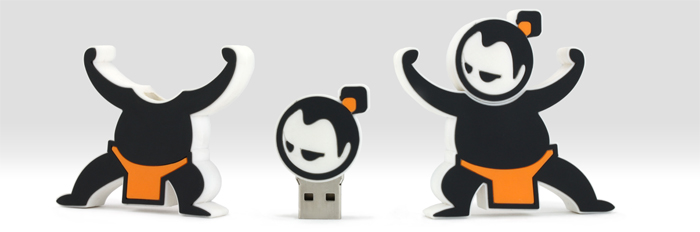
Sumo Wrestling Flash Drive
You could also create custom 2 dimensional shaped drives that would work just as well. Companies with unique logos or brand names can have their drives shaped to incorporate that concept. Coca-Cola, Pepsi, Microsoft, and Apple are instantly recognizable in a lot of cases solely by their company logo or brand name styling. So say you own a car detailing company whose logo incorporates your signature that looks unique and stylish in your own way, the custom shaped flash drives would integrate that concept into it. Lastly if you have a cool, funny or recognizable mascot like the android bot or Disney’s Mickey Mouse, you can take that concept, and make 3 dimensional graphic miniatures that hide the USB function but incorporate it all the same. It’s fun to carry around in your car or on a key chain and doesn’t take up much room.
So if you own or manage a business you’ll probably be on the constant look out for ways to increase your sales and to keep your name in front of customers. There are countless ways to go about this, but ultimately it’s about getting your company logo or brand into the brain of your target market. Using custom shaped USB flash drives is the perfect way to do just that; there are many reasons to consider these over other promotional items during sales calls and other events. Because customized memory sticks are not very big you need to decide what information you want to include on them. Usually your logo and contact information such as your website is sufficient; you don’t need to include too much else on those customized memory sticks. Your clients and customers probably already know what you sell so there’s no need an entire sales pitch in such a small space! Keep it brief but recognizable when you have them imprinted. And why are customized memory sticks such a great option? People need to have promotional items that they use and that they use often. Not everyone drinks coffee so coffee mugs may be a waste of money, and while everyone uses pens, they eventually dry up and get tossed out. USB flash drives are constantly reusable and far exceed their value in your future marketing endeavors.
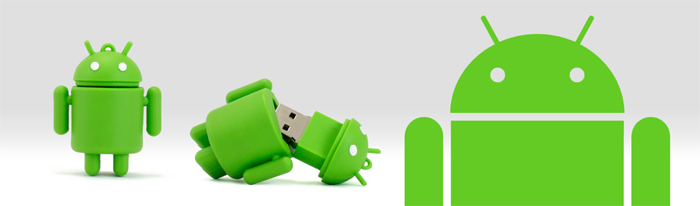
Android's Andy USB drive
One of the great things about working at usbmemorydirect.com is all the cool companies and brands we get to collaborate with. Recently we had the pleasure of printing custom USB drives for Blizzard Entertainment, a company I have a lot of personal experience with. Blizzard is a video game developer and publisher, which will soon be celebrating 20 years since its inception. My personal experience with Blizzard stems back to 1994, when I was just a kid with my very first computer. I didn’t have any computer games, but I did have a demo for Blizzard’s first game, “Warcraft”, which I played incessantly. Since then I have been a loyal customer and have played many of their computer games, even to this day. Needless to say, when I learned we would be making an order of flash drives for them, I was pretty excited about it.

The drives Blizzard choose to use, are the SWM style USB drive, which is one of our top-selling flash drives. As you can see, it has a swivel cap where the logo is printed. This is convenient as the caps from flash drives often are misplaced. I think this design showcases how you do not need any gimmicks or an outrageous design to make attractive USB drives for marketing. In this case the logo speaks for itself, as anyone familiar with the brand can instantly recognize the brand. These drives really came out great and I hope Blizzard is as pleased with them as we are. What they will do with them is anyone’s guess, but I think it would be awesome if they made their next release available on flash drive! I would certainly buy one.


This week, I’ve got some concept photos to show off. We offer dozens of styles to choose from when you are designing your own custom drive, and one of the most popular are the card styles. Card style USB drives are about the size of a standard credit card, a bit thicker, and they’ve got a built in USB drive! These make wonderful business cards to hand out to business associates and they make a great impression when you are making new contacts. The USB dongle can be programed to launch your website when it is plugged in, or you can store your catalog and promotions on it.

Although these are concept designs, we can easily design and produce these USB business cards for you or your company, just request a quote from our contact page, and we will get back to you with prices and availability within minutes!

While we post pictures of many of the unique drives that are ordered from us, when the order falls into one of two categories, I make it a point to snap some photos. Those two categories are: well known, global organizations (such as our drives for BMW, McDonald’s, and Heineken) and computer & internet related organizations (Zoosk, CBTNuggets.com, ClareHome). Today we have an order that fits both my favorite categories: swivel style drives for Intel Corporation, the multinational computer chip manufacturer. Feast your eyes on this:

Intel choose to go with our swm style, a capless USB drive with their logo printed right onto the metal swivel part of the drive. They also ordered custom printed cases with the drive, wallet sized metal boxes that feature Intel’s logo as well as a clear window through which you can see the USB drive. I can’t help but wonder what use these drives will be put to: will they be distributed to consumers as a promotional product, or will they be used in-house in one of Intel’s factories or corporate offices? Ultimately I cannot speculate what Intel’s intentions are for these drives, but I do know this, the Intel logo looks great on this white and silver drive and I wish we had some extras so I could add one to my collection. Oh well, there’s always the next order…


Our latest custom shaped flash drive was ordered by a company called ClareControls for their new line of cloud based smart-home technology. I have been interested in smart houses and the products designed for them for a few years now, as it is apparent to me that technology like this will become common place in the coming years. ClareHome utilizes cloud based computing to allow you to control your home from anywhere using a variety of devices. Powered by Mac mini computers, they have developed their own operating system, ClareOS, and a library of apps that allow you to control a variety of devices, from your fireplace to your house alarm or your garage door.

ClareControls choose to have their company logo made into a custom flash drive, and I’d say the results are right on point. The logo features a house inside a cloud and is the perfect representation of what the company is about. The back of the drive has the name of the company in raised lettering which also looks very good. All in all we were very pleased with how the order turned out, and we hope our clients are as happy with them as we are.

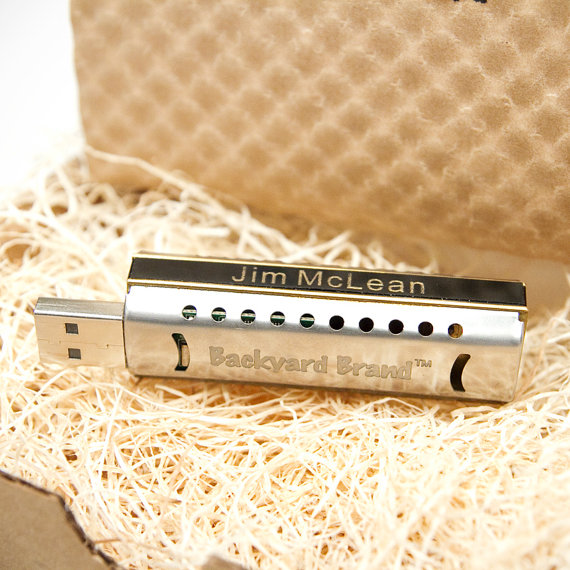
Besides making the specific flash drives our customers order, we also spend a lot of time online, scouring the internet for cool and interesting ideas to incorporate into flash drive design. Sometimes we find somebody who has beaten us to the punch, so to speak, and made a really unique flash drive on their own. This is exactly the case with the drive I’m featuring today, the FlashHarp. Found on etsy.com this drive is a functional harmonica, as well as a working flash drive, though its a bit smaller than the usual harmonica and a bit larger than the average flash drive.

Although a cool concept, the price tag is hefty for a 4GB flash drive, not to mention the fact that you cannot use both functions of the device at once, so if you were hoping to learn to play the harp while transferring files onto your flash drive, you will have to look elsewhere. Regardless of it’s shortcomings, this drive really caught our attention for being an original and fun idea. If you’ve got a cool flash drive or have seen a really unique one online, let us know. We are always interested to see what cool ideas are being thought up!


This week we had an order for MGSCOMM, a advertising agency, come through the office. The drives immediately caught my eye because of the vibrant colors the customer chose for their order. Though the flash drives they choose (the WBM style) were all black, they brightened the look of the drives by using their “think” logo in a variety of colors.

The logo on this style of drive is covered with an epoxy seal, making the design more durable as well as giving it an attractive shine. As you can tell, we had some fun taking photos of these drives!


